Drybrush painting creates texture and depth by applying paint lightly with a nearly dry brush, enhancing detail and contrast on your artwork. This technique is especially effective for highlighting surfaces like wood, fabric, or rough terrain. Discover how mastering drybrush can elevate your creative projects by reading the full article.
Table of Comparison
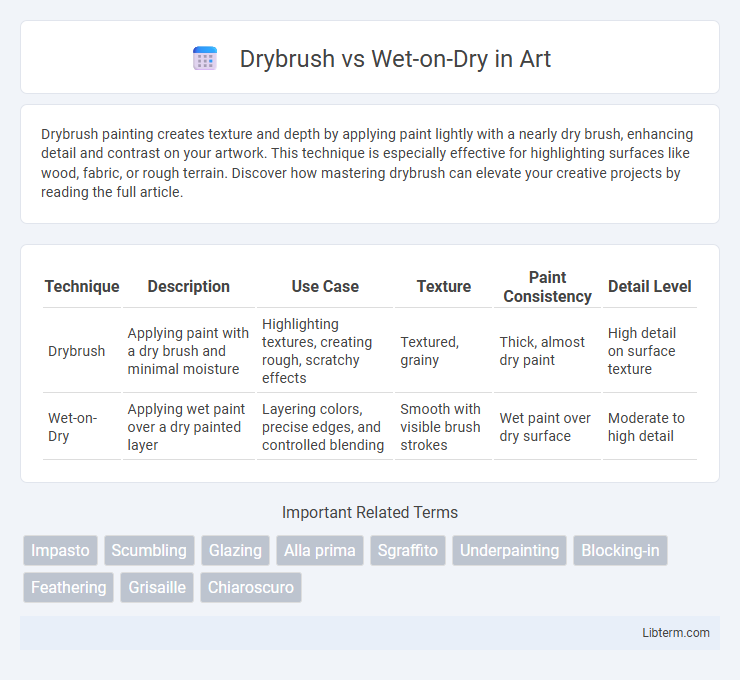
| Technique | Description | Use Case | Texture | Paint Consistency | Detail Level |
|---|---|---|---|---|---|
| Drybrush | Applying paint with a dry brush and minimal moisture | Highlighting textures, creating rough, scratchy effects | Textured, grainy | Thick, almost dry paint | High detail on surface texture |
| Wet-on-Dry | Applying wet paint over a dry painted layer | Layering colors, precise edges, and controlled blending | Smooth with visible brush strokes | Wet paint over dry surface | Moderate to high detail |
Introduction to Drybrush and Wet-on-Dry Techniques
Drybrush technique uses a nearly dry brush loaded with minimal paint to create textured, detailed strokes ideal for highlighting and adding fine details. Wet-on-dry involves applying wet paint directly onto a dry surface, allowing for more control and crisp edges in layering colors. Both techniques are fundamental for artists aiming to achieve varied texture and depth in acrylic, watercolor, or oil painting.
Key Differences Between Drybrush and Wet-on-Dry
Drybrush technique involves using a minimal amount of paint on a dry brush to create textured, scratchy strokes that highlight surface details and add depth. Wet-on-dry painting applies wet paint directly onto a dry surface, allowing for sharper edges and more controlled layering without blending. Key differences include texture intensity, edge sharpness, and the degree of blending achievable with each method.
Materials Needed for Each Method
Drybrush technique requires stiff brushes, thick acrylic or oil paints with minimal water or medium to create textured, scratchy strokes, and a rough surface like canvas or textured paper to hold the paint. Wet-on-dry method necessitates softer brushes, fluid acrylic or watercolor paints, and a dry surface to allow defined, layered brushstrokes, often using smooth watercolor paper or primed canvas. Both methods benefit from palette knives or mixing palettes, but brush type and paint consistency remain the primary distinguishing materials.
Understanding Brush Control in Both Techniques
Drybrush technique requires mastering minimal paint on a stiff brush to create textured, scratchy strokes, enhancing surface detail with controlled pressure and direction. Wet-on-Dry involves applying wet paint onto completely dry surfaces, enabling sharper edges and layered effects while demanding precision in brush movement to avoid smudging. Both techniques rely on nuanced manipulation of brush moisture, angle, and stroke speed to achieve distinct visual textures and clarity.
Achieving Texture: Drybrush vs Wet-on-Dry
Drybrush technique creates a rough, textured surface by using a brush with minimal paint, allowing the texture of the canvas or paper to show through, ideal for highlighting details and adding depth. Wet-on-dry method involves applying wet paint onto a dry surface, producing defined edges and layering possibilities that enhance texture through controlled contrast and color variation. Both techniques excel in texture manipulation, with drybrush emphasizing dry, scratchy effects and wet-on-dry offering sharper, more precise textures in painting.
Ideal Subjects for Each Painting Style
Drybrush technique excels in capturing fine textures and subtle details, making it ideal for subjects like weathered wood, delicate foliage, and intricate fabric patterns where control is paramount. Wet-on-dry painting works best for creating bold shapes and defined edges, suitable for architectural elements, portraits, and still life compositions that benefit from crisp contrasts. Both methods enhance realism but cater to different artistic goals depending on the desired texture and precision in the artwork.
Common Mistakes and How to Avoid Them
Drybrush often results in unintended harsh textures when too much paint is loaded, causing clumpy or uneven strokes. Wet-on-dry techniques may lead to visible brush marks if the paint dries too quickly or the layer beneath is not fully cured. To avoid these issues, use minimal paint with drybrush and ensure the base layer is completely dry before applying wet-on-dry for smoother transitions.
Step-by-Step Guide: Drybrush Application
Drybrush application involves loading a small amount of paint onto a dry brush and removing excess on a paper towel to achieve a textured, highlights effect on raised surfaces. Gently drag the brush across the area, allowing bristles to catch edges and create depth without fully covering the base layer. This technique enhances details in miniature painting, terrain modeling, and canvas art by emphasizing surface texture through controlled, light strokes.
Step-by-Step Guide: Wet-on-Dry Application
Wet-on-dry painting involves applying wet paint onto a fully dried layer, allowing precise control over edges and layering effects. Begin by preparing your canvas with a clean, dry base layer, ensuring it has completely dried to avoid unwanted blending. Use a fine brush to apply the wet paint, carefully layering colors to build depth and texture, while letting each layer dry thoroughly before adding the next.
Choosing the Right Technique for Your Art
Drybrush technique creates textured, detailed strokes by applying paint with minimal moisture, ideal for fine lines and subtle shading, while wet-on-dry involves applying wet paint onto a dry surface, allowing for sharp edges and controlled layering. Selecting between drybrush and wet-on-dry depends on your artwork's desired texture and precision; drybrush works best for rough textures and intricate details, whereas wet-on-dry suits bold, defined shapes and vibrant color layering. Understanding the effects and control offered by each method helps artists achieve their intended style and enhances the overall composition.
Drybrush Infographic