The 3-2 zone defense is a popular basketball strategy that positions three defenders along the perimeter and two near the basket to protect against both outside shooting and inside scoring. This formation effectively disrupts passing lanes and forces the offense to take contested shots from the perimeter. Discover how this defense can enhance Your team's defensive arsenal in the rest of the article.
Table of Comparison
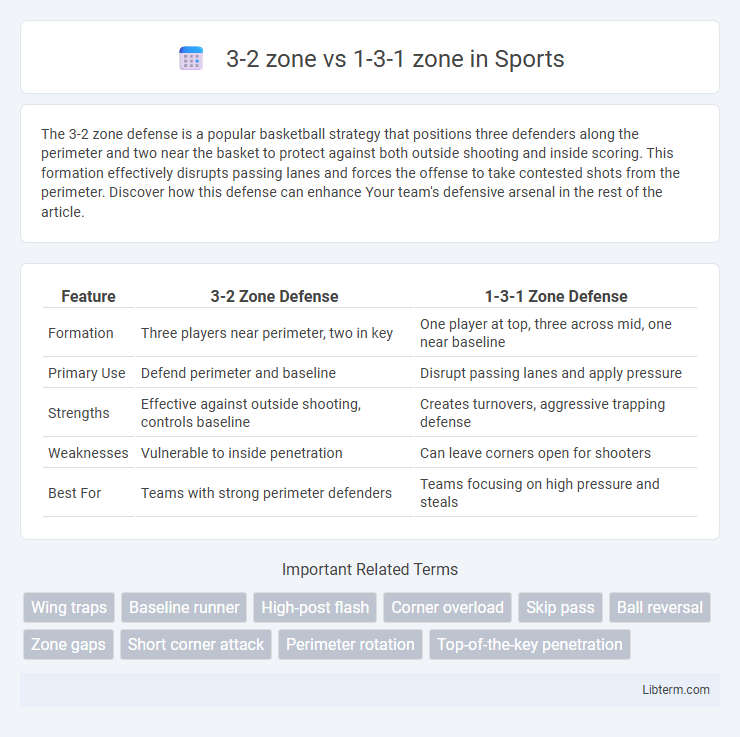
| Feature | 3-2 Zone Defense | 1-3-1 Zone Defense |
|---|---|---|
| Formation | Three players near perimeter, two in key | One player at top, three across mid, one near baseline |
| Primary Use | Defend perimeter and baseline | Disrupt passing lanes and apply pressure |
| Strengths | Effective against outside shooting, controls baseline | Creates turnovers, aggressive trapping defense |
| Weaknesses | Vulnerable to inside penetration | Can leave corners open for shooters |
| Best For | Teams with strong perimeter defenders | Teams focusing on high pressure and steals |
Introduction to Zone Defenses
The 3-2 zone defense positions three players along the perimeter and two near the baseline, effectively covering outside shooting threats and protecting the paint. The 1-3-1 zone defense arranges one player at the top, three across the middle, and one near the baseline, creating traps and disrupting passing lanes. Both zone defenses aim to limit opponents' scoring opportunities by forcing outside shots and causing turnovers through strategic positioning.
Overview of the 3-2 Zone Defense
The 3-2 zone defense positions three defenders along the perimeter and two near the baseline, focusing on protecting the paint and forcing opponents into contested outside shots. This alignment enhances coverage against mid-range jumpers and helps disrupt passing lanes on the perimeter. Its structure is particularly effective against teams that rely heavily on inside scoring and baseline drives.
Overview of the 1-3-1 Zone Defense
The 1-3-1 zone defense positions one player at the top, three players across the middle, and one player near the baseline, designed to trap ball handlers and disrupt passing lanes effectively. This setup emphasizes aggressive perimeter pressure and quick rotations to force turnovers, contrasting with the more balanced coverage of the 3-2 zone. Its strategic layout aims to limit inside scoring opportunities while creating chaos for opponents in the backcourt.
Key Strengths of the 3-2 Zone
The 3-2 zone defense excels in protecting the paint and forcing opponents into contested perimeter shots by positioning three defenders near the basket and two along the perimeter. Its key strength lies in its ability to disrupt inside scoring opportunities and control rebounding, making it highly effective against teams reliant on post play. This setup also enhances defensive communication and rotation, allowing for quick adjustments to offensive movement.
Key Strengths of the 1-3-1 Zone
The 1-3-1 zone defense excels at creating turnovers through intense perimeter pressure and trapping in the corners, disrupting passing lanes more effectively than the 3-2 zone. Its alignment with one defender at the top, three across the middle, and one along the baseline enhances defensive versatility and helps contest both inside and outside shots. This formation maximizes defensive coverage by forcing opponents into rushed decisions and low-percentage shots, increasing opportunities for steals and fast-break transitions.
Weaknesses of the 3-2 Zone
The 3-2 zone defense struggles against teams with strong perimeter shooting, as it leaves the corners vulnerable to three-point attempts. Its positioning often creates gaps near the baseline, allowing opponents to penetrate or execute effective skip passes. Additionally, the 3-2 zone can be less effective against quick ball movement and agile guards who exploit the mid-range areas outside its coverage.
Weaknesses of the 1-3-1 Zone
The 1-3-1 zone defense struggles with perimeter shooting due to gaps at the wings and corners, allowing opponents to exploit open three-point opportunities. This formation is vulnerable to baseline penetration as the single defender near the basket can be overwhelmed by quick ball movement and effective passing. Compared to the 3-2 zone, the 1-3-1 offers less interior rim protection, leading to higher susceptibility against strong post players and offensive rebounds.
Situational Uses: When to Deploy Each Zone
The 3-2 zone defense excels against teams with strong perimeter shooters by providing extended coverage along the three-point line, effectively contesting outside shots and disrupting ball movement. The 1-3-1 zone is optimal in situations that require aggressive trapping and creating turnovers, as its unique shape pressures guards and corners while funneling the offense into predictable passing lanes. Coaches often deploy the 3-2 zone late in games to protect a lead with disciplined perimeter defense, while the 1-3-1 is used to shift momentum quickly by forcing turnovers and increasing defensive intensity.
Tactical Adjustments and Variations
The 3-2 zone defense emphasizes perimeter pressure and quick ball rotation to disrupt outside shooting, requiring tactical adjustments such as shifting wing defenders to trap ball handlers and prevent penetration. In contrast, the 1-3-1 zone creates a layered defensive structure with a deep middle defender and aggressive sideline pressure, demanding variations that focus on trapping corners and forcing turnovers in passing lanes. Coaches often switch between these zones to exploit opponents' weaknesses, adapting player positioning and help-side rotations to optimize defensive coverage and rebounding.
Comparing 3-2 vs 1-3-1: Which Fits Your Team?
The 3-2 zone defense places three players along the perimeter and two near the baseline, optimizing perimeter shooting contest and baseline protection. In contrast, the 1-3-1 zone features one player upfront, three in the middle, and one deep, promoting aggressive trapping and disrupting passing lanes. Teams with quick, versatile wings may excel in the 1-3-1 due to its pressure and turnover potential, while squads prioritizing balanced perimeter and interior defense often find the 3-2 more effective.
3-2 zone Infographic