The scoring zone in sports refers to the critical area on the field or court where players have the highest chance of successfully scoring points or goals. Mastering positioning and strategies within this zone significantly improves your offensive effectiveness. Explore the rest of the article to learn how to dominate the scoring zone and boost your performance.
Table of Comparison
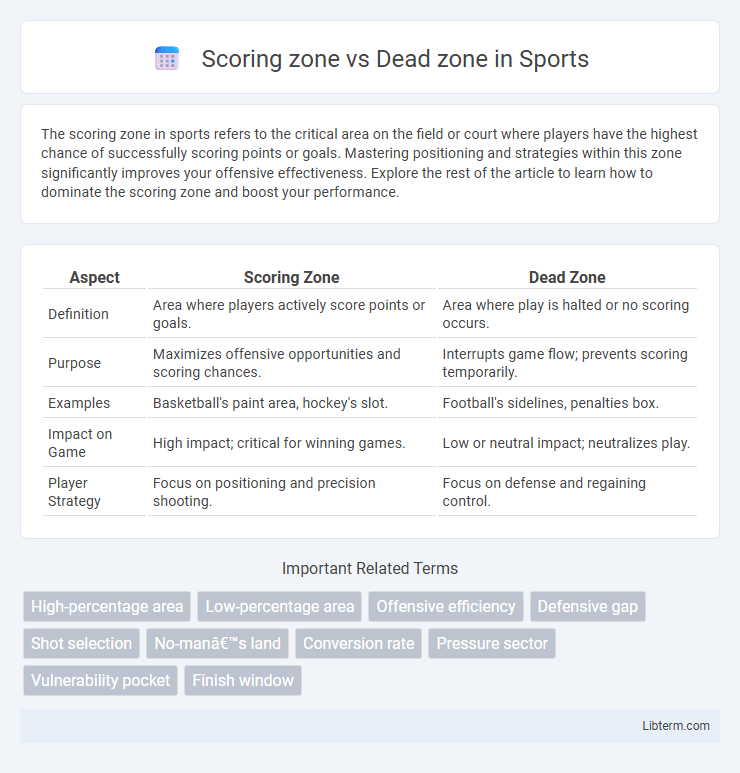
| Aspect | Scoring Zone | Dead Zone |
|---|---|---|
| Definition | Area where players actively score points or goals. | Area where play is halted or no scoring occurs. |
| Purpose | Maximizes offensive opportunities and scoring chances. | Interrupts game flow; prevents scoring temporarily. |
| Examples | Basketball's paint area, hockey's slot. | Football's sidelines, penalties box. |
| Impact on Game | High impact; critical for winning games. | Low or neutral impact; neutralizes play. |
| Player Strategy | Focus on positioning and precision shooting. | Focus on defense and regaining control. |
Understanding the Scoring Zone: Key Concepts
The Scoring Zone in sports analytics represents the critical area on the field or court where offensive players have the highest probability of successfully scoring, often defined by proximity to the goal or basket and shooting angles. Understanding the Scoring Zone involves analyzing player positioning, shot selection, and defensive pressure to optimize scoring efficiency. In contrast, the Dead Zone refers to areas with low scoring potential due to poor angles, extended distance, or strong defensive coverage.
Defining the Dead Zone in Sports Contexts
The dead zone in sports refers to areas or moments where player actions have minimal or no impact on the game's progress or scoring opportunities, contrasting with the scoring zone where offensive plays are most effective. In basketball, the dead zone might be outside the three-point line for a poor shooter, while the scoring zone is near the basket or free-throw line. Understanding this distinction helps teams optimize strategies by focusing efforts where scoring probability is highest and minimizing time spent in unproductive areas.
Comparing Scoring Zone vs Dead Zone: Main Differences
The scoring zone refers to areas in a game or field where players have a high probability of successfully scoring points, characterized by optimal positioning and advantageous angles. In contrast, the dead zone is a region where scoring opportunities are minimal or non-existent due to poor visibility, limited control, or defensive dominance. Understanding the main differences between the scoring zone and dead zone helps teams strategize effectively by maximizing offensive potential and minimizing wasted efforts in low-impact areas.
Strategic Importance of the Scoring Zone
The Scoring Zone represents the optimal area where players have the highest probability of successfully accumulating points, making it a critical focus for offensive strategies in sports like basketball and soccer. Controlling the Scoring Zone enhances team efficiency by maximizing shot quality and reducing defensive pressure, directly impacting the chance of scoring. In contrast, the Dead Zone lacks scoring opportunities and serves more as a transitional or defensive region, emphasizing its lesser strategic value in point generation.
Challenges and Risks of the Dead Zone
The Dead Zone in business strategy presents significant challenges such as stalled innovation and declining market relevance, causing companies to lose competitive advantage. Risks include diminished customer engagement and revenue loss due to outdated products or services failing to meet evolving market demands. Navigating the Dead Zone requires proactive adaptation and continuous innovation to prevent long-term organizational stagnation.
Techniques for Maximizing Scoring Zone Effectiveness
Maximizing scoring zone effectiveness requires precise shot placement and controlled power to consistently target high-value areas on the board. Emphasizing techniques such as steady grip, focused aim, and repetitive practice enhances accuracy within the scoring zone while minimizing the risk of darts landing in the dead zone. Utilizing visual markers and adjusting release angles optimizes dart trajectory, ensuring darts cluster tightly in scoring zones for maximum points.
Common Mistakes Leading to the Dead Zone
Common mistakes leading to the dead zone include poor shot placement, such as targeting low-percentage areas far from the scoring zone, and failing to recognize defensive positioning that limits scoring opportunities. Neglecting proper angle and power control often results in shots that either miss the net entirely or bounce harmlessly away from prime scoring territory. Understanding the spatial dynamics between the scoring zone and dead zone is essential for improving accuracy and maximizing scoring chances.
Psychological Aspects: Player Performance in Both Zones
Players exhibit increased confidence and motivation within the scoring zone, where proximity to the goal intensifies focus and heightens adrenaline, enhancing shot accuracy and decision-making. In contrast, the dead zone triggers psychological fatigue and reduced engagement, as players perceive limited opportunity and effectiveness, leading to decreased effort and slower reaction times. Psychological resilience and situational awareness are critical for maintaining performance, enabling players to overcome mental blocks in dead zones and capitalize on opportunities in scoring zones.
Coaching Tips: Moving From Dead Zone to Scoring Zone
Transitioning from the dead zone to the scoring zone requires targeted coaching strategies that emphasize spatial awareness and quick decision-making under pressure. Coaches should encourage players to recognize high-value areas on the field where scoring opportunities increase, focusing on improving movement off the ball and passing accuracy to exploit scoring zones effectively. Drills that simulate game scenarios in the dead zone can enhance players' ability to create space and convert these areas into offensive advantages.
Case Studies: Real-World Examples of Both Zones in Play
Case studies in basketball analytics reveal the scoring zone as areas on the court with the highest shooting efficiency, typically within the paint and beyond the three-point line, while dead zones correspond to mid-range areas with lower shot success rates. Analysis of NBA shot charts from players like Stephen Curry and Kevin Durant confirms a higher points per attempt in scoring zones, underlining tactical emphasis on these regions. Defensive strategies also adapt by forcing opponents into dead zones, demonstrating the real-world impact of optimizing spatial shot selection for maximizing team scoring output.
Scoring zone Infographic