Wet-on-Dry technique involves applying wet paint over a completely dry layer, allowing for sharp edges and precise details in your artwork. This method is ideal for creating intricate designs and controlled textures without colors blending unintentionally. Explore the rest of the article to master Wet-on-Dry techniques and elevate your painting skills.
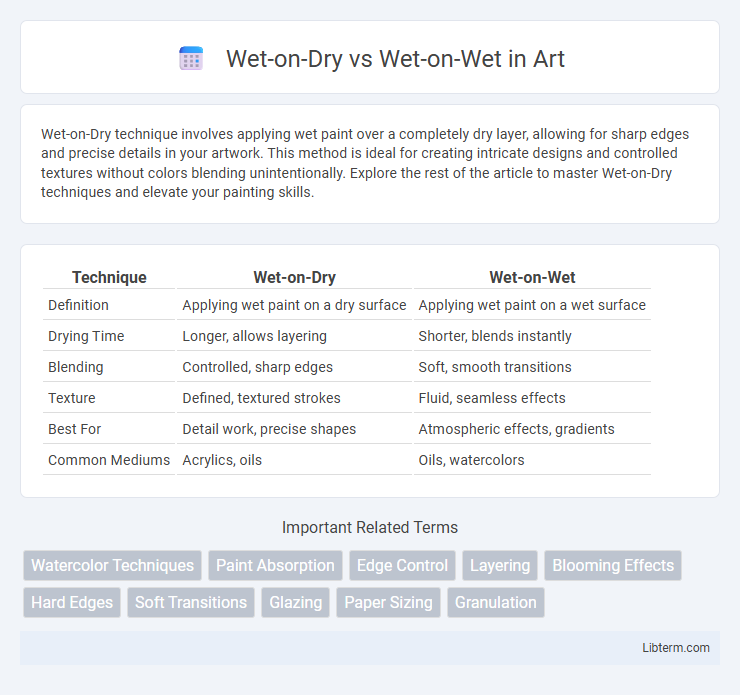
Table of Comparison
| Technique | Wet-on-Dry | Wet-on-Wet |
|---|---|---|
| Definition | Applying wet paint on a dry surface | Applying wet paint on a wet surface |
| Drying Time | Longer, allows layering | Shorter, blends instantly |
| Blending | Controlled, sharp edges | Soft, smooth transitions |
| Texture | Defined, textured strokes | Fluid, seamless effects |
| Best For | Detail work, precise shapes | Atmospheric effects, gradients |
| Common Mediums | Acrylics, oils | Oils, watercolors |
Understanding Wet-on-Dry and Wet-on-Wet Techniques
Wet-on-dry painting involves applying wet paint onto a completely dry surface, allowing for precise edges and detailed work, making it ideal for layering and fine lines. Wet-on-wet technique, also known as alla prima, requires painting wet paint onto a wet surface, enabling smooth blending, soft transitions, and dynamic textures. Mastering these techniques enhances control over texture, color mixing, and the overall visual impact of acrylic or oil paintings.
Key Differences Between Wet-on-Dry and Wet-on-Wet
Wet-on-dry painting involves applying wet paint onto a completely dry surface, creating sharp edges and more control over details and textures. Wet-on-wet painting, also known as alla prima, allows wet paint to be applied directly onto still-wet paint layers, promoting smoother blending and softer transitions in color. The key difference lies in the drying time and blending effects, with wet-on-dry suitable for layering and precise brushwork, while wet-on-wet enhances fluidity and spontaneous mixing.
Materials and Tools Needed for Each Method
Wet-on-Dry painting requires absorbent surfaces like dry canvas or paper, along with brushes that retain precision such as fine-tipped or round brushes to create crisp lines and detailed textures. Wet-on-Wet technique demands a primed, often lightly moistened surface and softer, more absorbent brushes like filbert or mop brushes to blend pigments smoothly and maintain fluid transitions. Both methods benefit from quality acrylic or oil paints, but palette knives and mediums like retarders or flow improvers are especially useful in wet-on-wet applications to control drying times and enhance blending.
Advantages of Wet-on-Dry Painting
Wet-on-dry painting offers superior control and precision, allowing artists to create sharp details and defined edges that are difficult to achieve with wet-on-wet techniques. It provides better color separation, preventing hues from blending unintentionally and ensuring vibrant, consistent tones throughout the artwork. This method also enables layering and glazing, enhancing depth and texture in the painting.
Benefits of Wet-on-Wet Approach
The Wet-on-Wet painting technique allows artists to blend colors seamlessly on the canvas, creating smooth gradients and natural transitions that are difficult to achieve with Wet-on-Dry methods. This approach accelerates the painting process by enabling continuous manipulation of pigments, which enhances spontaneity and expressive brushwork. Wet-on-Wet also preserves the luminosity of oil paints, maintaining vibrant color saturation and depth for dynamic and lifelike artwork.
Step-by-Step Guide to Wet-on-Dry Application
Wet-on-dry painting involves applying a new layer of paint only after the previous layer has completely dried, ensuring crisp edges and defined details. Begin by prepping the surface, applying the base coat, and allowing it to dry thoroughly before adding subsequent layers to maintain precision. This technique is ideal for detailed work, sharp lines, and layering colors without blending, enhancing controlled textures and depth in artwork.
Step-by-Step Guide to Wet-on-Wet Application
Wet-on-Wet painting involves applying fresh paint layers directly onto still-wet surfaces, allowing colors to blend seamlessly for smooth gradients and soft edges. Begin by laying down a wet base layer, then immediately add additional paint without waiting for drying, using brushes or palette knives to blend hues naturally. This technique demands control over paint consistency and timing to prevent muddying and achieve vibrant, fluid effects essential in oil and watercolor artwork.
Common Mistakes to Avoid with Both Techniques
Common mistakes in Wet-on-Dry painting include applying too thick paint layers, which can cause cracking and extended drying times, and neglecting to allow the base layer to dry fully, leading to unwanted blending or lifting of colors. In Wet-on-Wet techniques, artists often err by overmixing colors on the canvas, resulting in muddy hues and loss of vibrancy, or by using incompatible paint consistencies that hinder smooth blending. Proper control of paint thickness and drying time is essential to maintain clarity and achieve desired effects in both Wet-on-Dry and Wet-on-Wet methods.
Choosing the Right Technique for Your Art Style
Wet-on-dry technique offers precise control and sharp edges, ideal for detailed and layered artwork, while wet-on-wet allows colors to blend fluidly, perfect for creating soft transitions and expressive effects. Artists should select wet-on-dry for defined textures and structural clarity, and wet-on-wet for dynamic, spontaneous compositions that emphasize color interaction. Matching the technique to your art style enhances expression and achieves the desired visual impact.
Expert Tips for Mastering Both Methods
Mastering wet-on-dry painting requires applying paint layers only after the previous layer has fully dried, allowing for precise details and sharp edges, ideal for controlled textures and fine lines. Wet-on-wet technique involves blending fresh paint directly on the canvas while still wet, perfect for smooth gradients and expressive, fluid transitions. Experts recommend practicing brush control for wet-on-dry and timing wetness carefully for wet-on-wet to achieve desired effects and maintain color vibrancy.
Wet-on-Dry Infographic